
Old school challenge - make your own electroscope
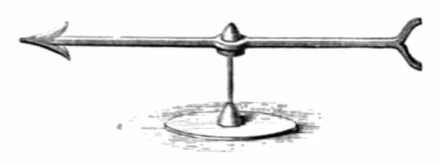
An electroscope is an instrument that is used to detect and measure electrical charge. Long before digital devices, this was the first electrical measuring instrument. The first electroscope was invented by a British physician called William Gilbery in the 1600s. It was called the Versorium. It was a needle constructed out of metal that could pivot as it was on a pedestal. It works in the same way as a compass needle except it is not magnetized. The needle is influenced by an electric charge and will move when it detects an electrical charge.
Over time this concept evolved. The pith-ball electroscope was invented by British schoolmaster physicist John Canton in 1754. While today a plastic ball or aluminum ball is generally used today, originally a plant-like substance called a pith was used and hence the term pith ball. The ball was suspended on a silk thread from a hook on an insulated stand. The ball will be affected by an electrical charge so if an object that is charged comes close to the ball, the ball should react and move.

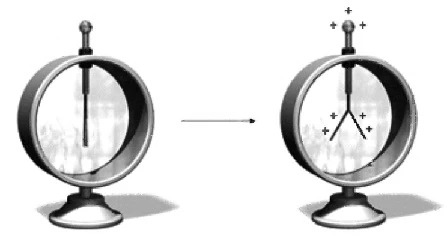
Then there is the Gold Leaf electroscope. This was invented in 1787 by a British clergyman and physicist Abraham Bennet. It is considered to be a more sensitive design than the pith ball. It is a design that has a vertical metal rod which is usually a form of brass and on the end of this is two strips of gold leaf and there is a disk or a ball attached to the top of the rod which detects the charge. The gold leaf is enclosed in a glass jar or bottle so that it is not influenced by the wind. When the disk or ball detects an electrical charge, the leaves will spread apart making a V.
So here is how to make your own electroscope using common household items. You may have even done this in science class. If you have kids, get them to help you, it is really easy to make and it is a fun little project.
How to make a Gold Leaf electroscope
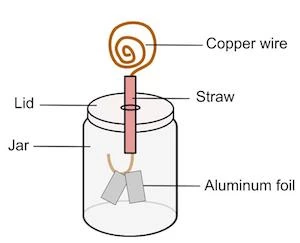
Get a glass jar with a lid. This is important because it means the wind will not be blowing the foil giving a false positive. Get some copper wire.
Drill a hole in the top of your lid. The hole needs to be big enough to fit the copper wire through a straw into the hole. Put the copper wire through the straw and through the hole in the lid. Curl the top of the wire into a spiral. Make sure there is enough copper wire at the end of the straw to make a little hook for the foil to hang from.
Instead of using gold leaf, however, we will be using aluminum foil. Cut two little wings of foil. Poke a small hole in the top of each piece of foil and thread it over the copper wire. You should now have two pieces of foil hanging off the wire.
Screw the lid tightly on the jar. It is now complete. If there is an electrically charged body near or touching the ball on top of the jar, the small flaps of foil inside the jar will spread apart.
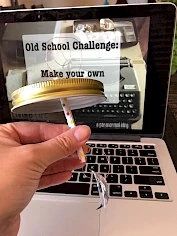
Here is one I quickly whipped up. I tested it by using a balloon that I rubbed against a cardigan and that gave an excellent result. It was enough for me to know that the electroscope worked! So the next thing I am going to do is take it on an investigation and see if I can get a spirit to manipulate it in the same way I would ask it to interact with a parascope (which also detects static electricity). It cost me around $6 if that to make. Old school is not just rewarding, it is also cheaper too!

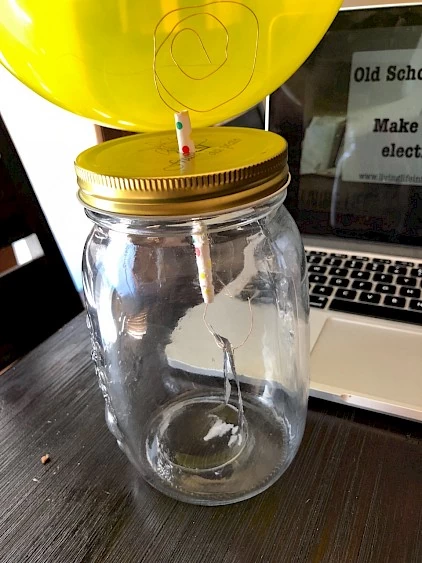
To test it works, I rubbed a balloon against a cardigan of mine to create static energy. When I held the balloon close to the copper coil at the top, the two pieces of foil quickly separated. When I took the balloon away, they went back together. Success!
So here is a fun little science project that I challenge you to try. Does it prove the existence of ghosts? Of course not and neither do K2’s meters or parascopes (the new flashy toys that detect static electricity). It detects static electricity be it natural or paranormal. We don't even know if ghosts can manipulate or give off static electricity, again it is one of those theories. It is up to you as the investigator to interpret the results of this experiment which is true with any piece of equipment. Now you have the foundations, so now I set you guys a little bit of a challenge. Take this very simple concept and use it during an investigation. Maybe adapt it, expand it and experiment with it. Put yourself in the shoes of the old school investigators and come up with some great concepts. Change the design, experiment with different materials. Let’s use our brains and come up with some really great inventions and concepts. Equipment can be fun and flashy lights are entertaining, but I guarantee you that there is nothing more satisfying than building an old school invention yourself and coming up with your own experiments. Tell me things you have tried in the past or maybe some ideas you have! Post some photos! Good luck.
If you enjoy LLIFS, consider buying me a book (otherwise known as buy me a coffee but I don't drink coffee and I LOVE books). Your donation helps to fund the LLIFS website so everyone can continue to access great paranormal content and resources for FREE!

Top pages with similar subjects
Don't forget to follow the Facebook page for regular updates
Join the mailing list to receive weekly updates of NEW articles. Never miss an article again!
Buy the latest and past issues Haunted Magazine
Check out the books written by LLIFS